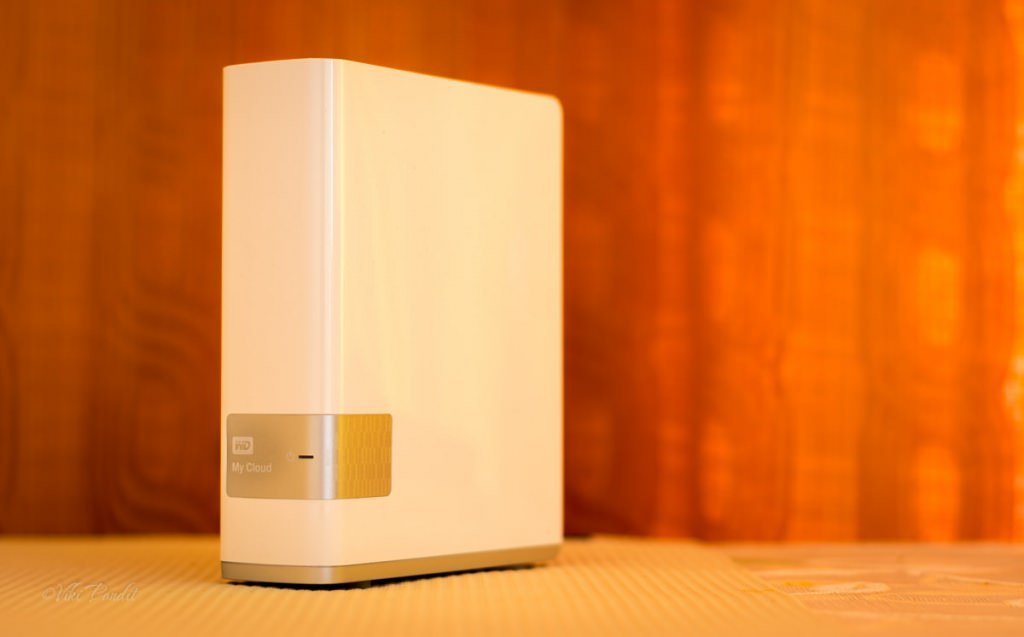
WD My Cloud 3TB Personal Cloud Storage

You never have enough space if you indulge in photography, more so if you are shooting RAW. Its only been a year or so that I started on this new hobby and it is very much clear to me that the laptop hard disk capacity will not suffice for much longer and I need to set up a Personal Cloud Server for storing my growing catalog of images.

In May last year I had purchased a Seagate Centeral 3TB NAS. It fulfilled most of my needs of backing up my files except that I had to use a third party software like SyncBack for continuously synchronizing the photos on my laptop. Seagate Central does have a native software to do that called Seagate Dashboard, but I didn’t find it very helpful. It used to keep creating new folder names with each sync and used up lot of resources on the laptop making it run slow even with 8 GB of RAM. The problem with using SyncBack is that it doesn’t auto sync my photos. I can add an auto schedule for the backup, but I still feel uncomfortable without a constant mirrored backup. I do own a 1 TB Dropbox account, but I do not intend on wasting my bandwidth on uploading hundreds of files out of which, I am later only going to keep a few.

So when the space on my Seagate Central started to dry up, I decided to try out the WD My Cloud 3 TB unit. Its a touch more expensive compared to Seagate Central in the same capacity. In fact for the same price, I could have gotten a 4 TB unit from Seagate. After using the device for over a month now, overall I am glad I choose to get this rather than another Seagate Central.

Compact Design

The WD My Cloud appears like a white book, the thickness of a Harry Potter novel. It was possibly designed to gel with the array of Macs that are white in color. With my all-black setup, it does appear as an odd one. It is a single volume storage device housing one 3.5-inch hard drive. The device is very compact. Its supposed to be kept vertically but I have kept it lying on the side, since it may tip over with my Labrador dashing around the house on a regular basis. Once you power the device, the front blue LED status lights up. It stays solid when it’s powered up and flashes whenever there is data activity.

Towards the back is a Gigabit Ethernet port, a USB 3.0 port and a power connection port. The USB 3.0 port can be used as a storage extension for backing up data or for creating restore points on an external USB or hard drive. The setup is really easy and you won’t need much help from the setup guide.

Setup WD My Cloud

Once I connected it to the power and hooked it to the  network port of my Netgear router, it appeared immediately on my laptop as WDMYCLOUD in the list of Networks. By default, the NAS comes set up with three public folders called Public, SmartWare and TimeMachineBackup. The Public folder is for storing public data, and the other two are for backups of Windows and Mac machines, respectively.

Connecting the NAS

I didn’t want my stuff to be available on the public folders. So the first thing I did was to download the WD SmartWare. The software was able to easily identify the MyCloud NAS and created all the necessary shortcuts for the Web interface. I created a user account with admin privileges. Once I created my account a private folder was automatically created with the username of the account holder. By default any user folder has public access. One has to restrict access using the Web UI. It should have been the other way round. Once my private folder was created, I set up the software to sync specific folders on my laptop HD. Yes, it allows selective synchronization. Isn’t that amazing!

WD My Cloud Web Interface

The shortcut for the interface should be on your desktop. If you lose it, it should be a URL like http://192.168.1.x/UI . You can know the IP of the NAS by logging into your router and see its assigned IP. The web interface is well-organized, with six tabs on top for Home, Users, Shares, Cloud Access, Safepoints, and Settings. Most of the tabs are self-explanatory. The Cloud Access tab allows you to sign up for a WDMyCloud.com online account for each user account of the NAS server, and to create an access code for the mobile device app. These are both powerful features.

[su_section]

 [/su_section]

The online account with https://www.wd2go.com/ basically allows a VPN-like connection over the Internet for computer users. For example, if I am traveling I can just point the browser on my Viao to https://www.wd2go.com/ and log in with my WDMyCloud account, and I can create a network drive linked to my folder on the My Cloud NAS server at home provided the NAS is connected to internet at my home.

The access code for mobile devices is pretty useful. I created a user account for my wife on the NAS server, created an access code, and gave her the information. She then downloaded the My Cloud mobile app on her Android and entered the code. Now she is also able to share/store files on the NAS as well. I find it very interesting as I can now create user folders for close friends and family and they can share files with me from any part of the globe on my NAS.

Accessing WD My Cloud via Android

Next I downloaded the My Cloud mobile app on my LG Android, the app easily detected the My Cloud device. If I am on the move, with the https://www.wd2go.com/ account, the mobile app on my device still maintains access to the My Cloud NAS server via the Internet. I currently have WD My Cloud & WD Photos on my Android connected.

WD’s My Cloud mobile app is very similar to Seagate’s Media mobile app for the Seagate Central. With this app, you can access the public share folders as well as the private share folder of the current user. You can quickly download files from the NAS server to the mobile device or back up files, such as photos and videos, from the mobile device onto the NAS server. The WD My Cloud app and the Seagate Central app both are set up on my LG phone running on Android to auto backup my images and videos on the phone to respective devices. However I don’t like it, that they save into a public folder.

WD My Cloud Data Safety

As a single-volume NAS server, the My Cloud has no real-time mechanism guarding it against the failure of the internal hard drive. To make up for this, you can easily back up its contents using the Safepoints feature. This creates a restore point for the server by copying its entire contents onto an external hard drive connected to its USB 3.0 port or to another NAS. When I tried creating a safepoint, it easily recognized the Seagate Central Unit. Once I selected that, it asked for the password to login to that units user account and created a safepoint on that device. Isnt that fabulous. If  something goes wrong with the WD My Cloud, I can restore the NAS. When or if you choose to do this make sure that the second unit has equal or more capacity as the WD My Cloud NAS.

Pros

  • I get a ton of capacity for all my photographs. You can choose from 2 TB, 3 TB & the latest 4 TB
  • Anywhere access. Even If I am not at my home, I can still access the files via the internet.
  • Automatically backup my smartphone, tablet and computer files, unattended.
  • With My Cloud, I never have to pay fees to access my own content except when I am connected via the internet (internet charges will apply). Dropbox costs me around INR 6000 every year.
  • My content is stored safely at home, under my roof, where it belongs.
  • My Cloud is on my own network, so backing up is much faster and cheaper. I backed up 500 GB of data in a couple of days over a wired connection. The same on a service like Dropbox would have taken a week and cost me 500 GB of bandwidth. Yikes!

Cons

  • The device needs a docking station that provides a more stable base. In its current shape, I am always afraid its going to fall sideways.
  • Needs to go Black. Most devices are black today. Form UPS to routers to mouse to keyboard. White looks off. Maybe fine in a Mac configuration.
  • The file transfer speeds are still slow over wireless but a bit of improvement over wired connections. Wirelessly I never get more than 5-6 Mbps file transfer. Over wired it goes up to around 60Mbps but this can go up further depending on how fat your router is.
  • Every time a user account is created, the new folder created is publicly available to all users connected. It shouldn’t be so. The folders should be initially private and could be configured for access/restriction through the web interface.
  • The problem with Smart mirroring software from WD is that it isn’t that smart. When I delete files from my photography collection, they stay on WD My Cloud. So basically I can’t use that folder in case my laptop crashes.
  • If you are the finicky type, the shiny white surface scratches very easily. Just placed on the desk my device has already gathered quite a few scratches on the sides and it doesn’t look pretty. The webbed covering of Seagate Central still looks brand new after 6 months.

Recommendation

In the My Cloud, WD has combined data sharing, media streaming, backups, and a powerful personal cloud in a single compact box. If you are looking for just a storage solution with ability to stream content, I feel Seagate Central would be a better choice since for the same price you get 1 TB more space. If however you are looking for a good backup option you should go for WD My Cloud.

Seagate Central 3TB Personal Cloud Storage NAS

As the camera mega-pixels increases, so does the hunger for backup space. My new D7100 takes photos at 24MP and soon I found myself searching through online forums for a good backup solution. I already had a Seagate 2TB BackUp Plus but it involved to many wires, so this time I was leaning towards a wireless solution. After a bit of searching I finally ended up with two options: The WD My Cloud NAS and the Seagate Central NAS. The WD My Cloud devices were a bit more pricey so I went with Seagate Central 3TB.

Compact Design

Its a black device, very light in fact lighter than my Seagate 2TB BackUp Plus and about twice the size of an 3.5-inch internal hard drive.The top of the device is composed of a mesh grille that largely resembles the front of a speaker and helps to keep the HDD inside from overheating.. On the back it has one Gigabit Ethernet port and one USB port. Do not use the USB port to connect directly to your computer/laptop. It can only be used as an extra backup solution.

Setting up Seagate Central

The Central’s Web interface opened by itself in the browser: http://seagate.com/central/setup. I just followed the instructions to detect the NAS server and create my user account which I was going to use to log into the server’s Web interface. Once setup, you can always return to this interface via the server’s IP address.

[su_highlight background=”#99cdff”]Note: Bookmark the web interface link in your browser or you will lose it.[/su_highlight]

Connecting the NAS

Connecting the Central to my laptop was pretty easy. I just connected the device to my WiFi router and that was it. I could see the new drive in “My Computer.” What was more difficult was getting to install the “Seagate Dashboard.” It kept running into an error with admin security privileges. Eventually I had to run the install-able via “Run As Administrator.”  The Dashboard lacks the functionality to make any setting changes. One has to use the Web Interface for those.

seagate-central-dashboard

The Seagate Central by default had this public folder. Once I created my account it created another folder with the username. Its a very practical and helpful that I can store my shared data like music on the Public folder and my sensitive data in my private folders. Data on the public folder can also be used as a centralized media library where I can wirelessly stream my movies, music and photos to a DLNA device on my home network.

Seagate Central is a single-volume storage device, this helps to keep it small and compact but on the flip side it doesn’t provide data protection against hard-drive failure.  Advanced NAS Servers – multiple-volume storage spaces offer much faster speed and also data protection but are pretty expensive. So I set up my old 2TB Backup drive connected via the USB, as a precautionary backup, just in case.

I am yet to test out the web interface for accessing files, but I don’t have my hopes high since most online reviews don’t give them much points on that count.

Facebook Backup

The Seagate Central also offers Facebook backup services. Under the Social tab, you can add a Facebook account. When you do, all of your photos and videos from Facebook are copied onto the NAS. But not sure why one would use it if they already have Google Auto-backup setup on the smartphone, which is in my opinion a much better option and the photos on your laptop/desktop are already backed up to Central. Facebook compresses the photos too much, I would rather save my original photos. The Web Interface also contains the link to the Android Store for the app to connect my Android Tablet and Smartphone to the Central.

Performance

Performance-wise, it offered around 8MBps over the WiFi and around 20MBps over the wired network, I WILL need to upgrade my router. I believe the speed can be improved significantly at least over the wired connection.

Pros

  • The Seagate Central is much cheaper than other advanced NAS servers in the same capacity.

Cons

  • The Android app doesn’t seem to be able to connect to private folders
  • Each time I open the Seagate Central App on the Android, it tries to connect again.
  • Major performance lag. The auto backup feature totally saps my Laptop’s 8 GB memory. Cant get anything to work while it does its job. Had to disable it eventually.
  • WiFi speeds have to be greatly improved for it to qualify as a wireless backup solution.

Conclusion

For a variety of reasons, I would rather get a WD My Cloud over the Seagate Central. The device doesn’t fail in what its supposed to do but the software leaves much room for improvement.

Update: I recently upgraded to Netgear N750 Wireless Dual-Band Gigabit Router, but I don’t see any speed difference. I am still connecting to the 2Ghz network from my Viao. I do experience better streaming of movies to my phone that is able to connect to the 5 Ghz network.

Please comment if you have had better file transfer speeds than 10mb/sec using Wifi. I would really like to know how.


My EVDO Wireless USB from BSNL

I got my BSNL EVDO 3G wireless USB eventually after 2 months of application time. The gadget itself(AC8700), from ZTE is pretty cool. They offered me an unlimited downloads package for Rs.750 a month with all India roaming(except Mumbai & Delhi). BSNL is the only telecom operator which is truly providing Unlimited Data Plans in this category. I am not really thrilled with their max speed of upto 150kbps (at home) that I currently get, but its still better than the other available options.

What is EVDO?

EVDO is the 3G service developed for CDMA by QUALCOMM. EVDO (also spelled EV-DO) stands for Evolution-Data Optimized. One of the main attraction of EVDO is it’s promise to deliver high speed connectivity on the move. But unfortunately, since BSNL’s EVDO service is still in early stages here in India, we need to wait a lot before we can enjoy the luxury of the fully fledged EVDO internet service. The good news is BSNL is continuously working on upgrading their towers with BTS(Base Terminal Station). A single BTS is capable of covering up to an radius of 5 to 7 Kilometers of even more. For EVDO to work properly, each tower needs to have its own BTS. The nearest tower near my place is Bhagajatin which is nearly 1-2 kms away. I believe with more towers the speeds will certainly increase.

BSNL EVDOHow do I apply for a BSNL EVDO Broadband Connection?

Visit the main BSNL office in your area to get EVDO connection and apply got an EV-DO connection. They are most of the time short of Hardware, so it will take some time before you can buy one. If you already have a BSNL service (landline or post paid mobile), you just need to fill out a form. If you don’t have an existing service, you will need to give an address proof document also/either (photo copy of your passport, election id card, driving license etc.). The verification took a day after which I was called to the office and issued the EVDO card with a RUIM sim that enables me to use the Internet facilities almost all over India.

Why is my EVDO Internet access speed so slow?

If you are very near a tower but still experience slower downloads it might be due to absence of Edge. EVDO connects on 2 different technologies. one is EDGE and other is CDMA x 1, if the tower which you are connecting has edge enabled then you will be getting 2.4 mbps but if there is no edge tower then it will work on CDMA which is 144 kbps.

What are the costs?

The USB cost me around Rs.3000(including Rs.600 activation fee). They were also providing one Static IP for the fixed monthly charge of Rs. 150 per month. I went for a Rs.750 Unlimited monthly plan. They also have a cheaper Rs.199 a month plan with 500 Mb limit.